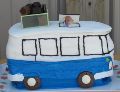
The bus arrived about a year ago November. When it pulled up, It looked pretty awesome.
Duvall's 67 deluxe
Duvall's 67 deluxe
Many of you have seen this bus in my shop. It is not mine (I wish it were). It belongs to Bill Duvall,one of the 6 founding members of the Columbus Vintage VW Club and a very old friend.
The bus arrived about a year ago November. When it pulled up, It looked pretty awesome. The bus came to me for an interior. It was soon obvious that while the exterior was beautiful, The body shop had not touched anything inside the first half inch of ANY of the openings. So much for just installing an interior. To be continued.
The bus arrived about a year ago November. When it pulled up, It looked pretty awesome. The bus came to me for an interior. It was soon obvious that while the exterior was beautiful, The body shop had not touched anything inside the first half inch of ANY of the openings. So much for just installing an interior. To be continued.
Re: Duvall's 67 deluxe
After we striped out all of the interior and Dennis started sanding we found lots of holes,including what looked like a complete replacement floor panel that had been cut up and used to patch the cab floor,which should have been replaced as a complete floor.
Not a bad job except for very globby welds and LOTS of daylight coming thru. For the holes,we used a product called U.S. Allmetal, a bondo/putty like product that actually has metal in it. It will even allow powdercoating. We used a fine screen and packed it with the allmetal and let it cure. then it could be ground and sanded.
dennis then ground all the ugly welds smooth and did the Allmetal treatment to the cab floor.
Now just waited for the Allmetal to cure for more grinding and sanding.
Not a bad job except for very globby welds and LOTS of daylight coming thru. For the holes,we used a product called U.S. Allmetal, a bondo/putty like product that actually has metal in it. It will even allow powdercoating. We used a fine screen and packed it with the allmetal and let it cure. then it could be ground and sanded.
Re: Duvall's 67 deluxe
Is this the same one that was in the back of your shop at Christmas, or is this a newer arrival?
Re: Duvall's 67 deluxe
same one. 
Re: Duvall's 67 deluxe
after better than 40hrs of sanding,grinding and prepping.
Pretty much the same had to be done on every square inch of the interior
finally!
Re: Duvall's 67 deluxe
a little more
Now to start thinking about the interior.
Re: Duvall's 67 deluxe
We wanted the paint to thoughly cure,at least a week.50% of what we painted was going to get covered with headliner which is glued on. Wanted to make sure that the adhesive would stick and not pull the paint off. SO, on to the sunroof assembly.
I knew that it would be pretty knarly just looking at it. It was.


dissassembled and ready to clean up


I knew that it would be pretty knarly just looking at it. It was.
dissassembled and ready to clean up

Re: Duvall's 67 deluxe
I bet those sunroofs are a pain in the royal butt to do and get looking right when all done!?
Re: Duvall's 67 deluxe
About 20 hrs in the frame mechanism. The 2 header pieces were sent out for blasting.


New guide pieces
The aluminum support bars were coated with white chalky oxidation, about 1 1/2 hrs on each one to clean them up and then clear coat them to prevent future oxidation.
ready to re assemble

New guide pieces
The aluminum support bars were coated with white chalky oxidation, about 1 1/2 hrs on each one to clean them up and then clear coat them to prevent future oxidation.
ready to re assemble
Re: Duvall's 67 deluxe
Since this bus left for it's owner in Florida on Tue, I thought I should get this thread updated.
With the sunroof mechanism restored and set aside, it's time to move on to the headliner,
Which has to bee done before sunroof install.
Since all the metal from below the belt line to the roof gets covered with HL material, We needed to locate ALL the mounting holes for the interior panels and window hardware and other stuff that fastens to the interior body.
Pictures like this are a great aid.
the interior panels from TMI DO NOT have the mounting holes for the fasteners punched.
SO,
Pretty much have to install ALL the interior panels,and then take them out for the HL install.
After you have located and punched all the holes, the headliner install can start.
this rear area panel was installed and remove 4 times (this pic is the 3rd install) to modify it and get the wrinkles out. this was the HL that WW offers, I have also used the TMI one. Niether is made correctly to fit without modifying.
almost finished with the headliner
With the sunroof mechanism restored and set aside, it's time to move on to the headliner,
Which has to bee done before sunroof install.
Since all the metal from below the belt line to the roof gets covered with HL material, We needed to locate ALL the mounting holes for the interior panels and window hardware and other stuff that fastens to the interior body.
Pictures like this are a great aid.
SO,
this rear area panel was installed and remove 4 times (this pic is the 3rd install) to modify it and get the wrinkles out. this was the HL that WW offers, I have also used the TMI one. Niether is made correctly to fit without modifying.
- Attachments
-
Who is online
Users browsing this forum: No registered users and 6 guests