
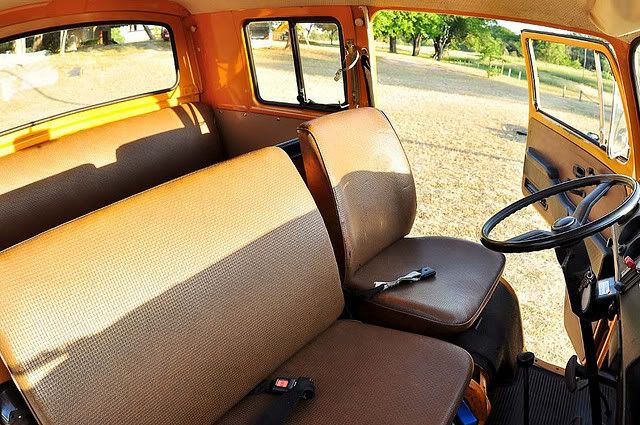
Had limited time to work on it today but wanted to get something done. I had finished cleaning and lubing the lock mechanism and my new door panels came in, so I decided to install the cargo door panel. Worst part was putting in those rubber grommets until I remembered to use a Ball End Allen Wrench to push them in. Also added a new check strap to replace the piece of rope that had been used prior. The door panel's color matched well with the seat and I was pleased with the results. Only had to cut a bit around the door latch and door pull for everything to fit well.
Also added a dome light. The previous owner appears to have had a hand sewn headliner installed and covered over the dome light opening. I was not sure if the wiring would be there but was pleasantly surprised to find it (small victories because that would have been a pain to fish through). Wiring in the dash is all apart and I have the battery disconnected so will have to wait to see if it works but for now it looks good.
1974 Double Cab Project
Re: 1974 Double Cab Project
- Attachments
-
-
Last edited by Rob on Tue Sep 01, 2015 9:24 am, edited 1 time in total.
1967 Beetle "Little Tud"
1968 Black Double Cab "The Black Pearl"
1970 Lotus White Single Cab "Big Tud"
1976 Sage Green Westfalia "Sweet Pickle"
They gotta' have names!
1968 Black Double Cab "The Black Pearl"
1970 Lotus White Single Cab "Big Tud"
1976 Sage Green Westfalia "Sweet Pickle"
They gotta' have names!
Re: 1974 Double Cab Project
Picked up a couple of muffler gaskets from Larry's Off Road today so I could install the heater tubes. The Double Cab sounds like a Volkswagen again, amazing what a difference a new muffler can make.
Wanted to keep working but did not want to get too deep into anything as it's getting late, it is a school night Plus my youngest son came out ( he is 9) and wanted to help me do something so we removed the rear interior panels. Nothing too bad behind the panels which is always a worry when you remove a panel for the first time.
Now these were handmade custom panels mind you. For years I have been throwing away cardboard boxes when all along they were door panels waiting to be made. I do have to admire the creativity of the Panamanian do it yourselfer though. They probably did not look too bad for a number of years and he did it himself with what he had available.
Wanted to keep working but did not want to get too deep into anything as it's getting late, it is a school night
Now these were handmade custom panels mind you. For years I have been throwing away cardboard boxes when all along they were door panels waiting to be made. I do have to admire the creativity of the Panamanian do it yourselfer though. They probably did not look too bad for a number of years and he did it himself with what he had available.
- Attachments
-
-
-
-
-
Last edited by Rob on Tue Sep 01, 2015 9:24 am, edited 1 time in total.
1967 Beetle "Little Tud"
1968 Black Double Cab "The Black Pearl"
1970 Lotus White Single Cab "Big Tud"
1976 Sage Green Westfalia "Sweet Pickle"
They gotta' have names!
1968 Black Double Cab "The Black Pearl"
1970 Lotus White Single Cab "Big Tud"
1976 Sage Green Westfalia "Sweet Pickle"
They gotta' have names!
Re: 1974 Double Cab Project
I do have a question. Does anyone know what if any special clips are needed to attach the rear panels. There are some round holes which appear to be the same as those in a door that accept a grommet etc... However there are oblong holes too where I would expect to see round ones. If they do require special clips do you know where I could get some?
- Attachments
-
-
-
Last edited by Rob on Tue Sep 01, 2015 9:31 am, edited 1 time in total.
1967 Beetle "Little Tud"
1968 Black Double Cab "The Black Pearl"
1970 Lotus White Single Cab "Big Tud"
1976 Sage Green Westfalia "Sweet Pickle"
They gotta' have names!
1968 Black Double Cab "The Black Pearl"
1970 Lotus White Single Cab "Big Tud"
1976 Sage Green Westfalia "Sweet Pickle"
They gotta' have names!
Re: 1973 Double Cab Project
This is the best photo of Chuck's DC. Looks like it used the chrome buttons like a Split to hold the rear panels in.
Re: 1973 Double Cab Project
I have been doing automotive upholstery for over 50 years. Have never seen a "clip" that fits into an oval hole, except on much newer vehicles. However, I have seen inserts,plugs like the ones pictured that accept a trim screw. I have seen these "oval" shaped,but don't have one to show. Try an automotive body shop supply store along with size of the hole. also search Auveco products.
Re: 1974 Double Cab Project
Thanks for the photo Ted and for the suggestions Bill. Did some research online and looked at a lot of photos. Seems that the majority of DC's after 71 are secured with fasteners that look like the ones that secure the rear hatch panel in a bus (chrome button head). However, there also appear to be some, mostly 68 to 70) that are secured with something not visible. I am guessing the panel kit I bought is for for the Early Bay American Model with a slightly fancier interior and my DC was originally fitted with a more spartan interior.
Last edited by Rob on Tue Sep 01, 2015 9:32 am, edited 1 time in total.
1967 Beetle "Little Tud"
1968 Black Double Cab "The Black Pearl"
1970 Lotus White Single Cab "Big Tud"
1976 Sage Green Westfalia "Sweet Pickle"
They gotta' have names!
1968 Black Double Cab "The Black Pearl"
1970 Lotus White Single Cab "Big Tud"
1976 Sage Green Westfalia "Sweet Pickle"
They gotta' have names!
Re: 1973 Double Cab Project
I just remembered,one of our members, Doc Mike, has an 86 bay Brazilian DC. ( last air cooled)It used to belong to Bob J.
You could try to PM him and maybe get pics.
You could try to PM him and maybe get pics.
Re: 1974 Double Cab Project
Started the wiring for the bus this weekend. The wiring is going to be a real chore for me. Spent the majority of this Saturday repairing wires and replacing splices with correct gauge wiring and colors. Seems that blue and black 14 gauge wire was in abundance for the PO. In fact when a larger gauge was needed they simply doubled up on the wire. Masking tape was used when electrical tape was not handy (note...plenty of evidence masking tape is not a good insulator  ). It does not appear that any attempt to follow the original VW wiring diagram was made as many switches were wired straight to the incoming twelve volts bypassing the fuse block all together. Everything worked but there was evidence of multiple shorts, melted wires etc... I have rewired buses before but not from scratch, usually most of the wiring was intact and I could simply repair and replace. The horn wire was routed to a push button on the dash, the rear taillights were operated from a separate switch also mounted on the dash, a Toyota turn signal relay was spliced into the wiring for the stock fuse block location and then left dangling below and a lawnmower type ignition switch was used and mounted to the dash. Most of the ground wires were rerouted, the ground mounting point below the windshield wiper was a popular spot with over 9 connections, they just spliced and twisted new connections to each other. One thing I am having a hard time figuring out is whether the ignition switch wiring (all the original wiring was removed) went directly to the fuse block or into a multiport connector first. My guess is that it went straight to the fuse block, though I am not the best with current flow diagrams. The turn signal and windshield wiper wiring were about all that was intact (at least at the switch) and I can see that they connect to a multiport connector.
The masking tape in my photo was for labeling purposes only
The masking tape in my photo was for labeling purposes only
- Attachments
-
- Ignition Switch
-
- Fuse Block
-
- Toyota Turn Signal Relay
-
- Rear Taillight Switch
Last edited by Rob on Tue Sep 01, 2015 9:32 am, edited 5 times in total.
1967 Beetle "Little Tud"
1968 Black Double Cab "The Black Pearl"
1970 Lotus White Single Cab "Big Tud"
1976 Sage Green Westfalia "Sweet Pickle"
They gotta' have names!
1968 Black Double Cab "The Black Pearl"
1970 Lotus White Single Cab "Big Tud"
1976 Sage Green Westfalia "Sweet Pickle"
They gotta' have names!
Re: 1974 Double Cab Project
Took a break from the wiring to sort out all the holes in the dash. Being that I cannot weld I needed to figure out a way to make the holes look better. I stripped and primered the dash. Smoothed out the holes with a dremel. Mounted the Headlight Switch and the Emergency Flasher Switch in their stock locations (I think) and then added a power supply port from a Westfalia and a defroster switch I will use for fog lights (ordered a new bezel). Then I used some chrome hole plugs from the hardware store to fill the other holes. Painted the dash satin black. I think it looks pretty good.
- Attachments
-
-
Last edited by Rob on Tue Sep 01, 2015 9:32 am, edited 2 times in total.
1967 Beetle "Little Tud"
1968 Black Double Cab "The Black Pearl"
1970 Lotus White Single Cab "Big Tud"
1976 Sage Green Westfalia "Sweet Pickle"
They gotta' have names!
1968 Black Double Cab "The Black Pearl"
1970 Lotus White Single Cab "Big Tud"
1976 Sage Green Westfalia "Sweet Pickle"
They gotta' have names!
Re: 1974 Double Cab Project
During the paint drying my wife asked me what I was doing. I said, "Waiting for the paint to dry," she said, "Great then you can go pick up the gigantic area rug I bought at a garage sale and bring it home." So I got the Single Cab out and went to do that too. Picking it up turned out to be the easiest thing, hauling it up the stairs was a bear.
- Attachments
-
Last edited by Rob on Tue Sep 01, 2015 9:33 am, edited 2 times in total.
1967 Beetle "Little Tud"
1968 Black Double Cab "The Black Pearl"
1970 Lotus White Single Cab "Big Tud"
1976 Sage Green Westfalia "Sweet Pickle"
They gotta' have names!
1968 Black Double Cab "The Black Pearl"
1970 Lotus White Single Cab "Big Tud"
1976 Sage Green Westfalia "Sweet Pickle"
They gotta' have names!