I started a new thread 'cause I couldn't find one on my Ghia. Anyway, it's been for sale and nobody wants to pay for the 2180 in it so I plan to put a stocker together for it. I have several cores so I'm feeling comfortable that one should have a good case.
Victim 1: The stock engine which came in the Ghia when I bought it. It's a B case which indicates it's a '70 1600SP, which means it's probably not the original engine in the car.
I drove this engine, it had low compression in one hole so it didn't stay in the car long, I put a stock 1600DP in it quickly. Here I do a leakdown test to confirm that #3 exhaust valve is spent.
Intending to overhaul this engine I took my time and prepped external components for reassembly. That means cleaning the intake pre-heater tube and etc. I was lucky and the tube cleaned up.
Endplay was not terrible, I think about .008" which means the case should be usable. Note the jugs look pretty new in the pic.
I pulled the top end off, and Surprise! It was fresh and had a brand new set of stock 85.5mm jugs and pistons in it, the endplay in the top piston ring was at new spec, .017" so it was a fresh engine with virtually no miles. I sent the heads out and had them done which went well, no issues with guides or anything and the bill was $120. That's a good start.....
Crap. The case needs a line bore and the thrust is worn, but not past cutting.
The real problem is the lifter bores, where a couple are super trashed.
See the movie:
That one's spent, it's not worth doing a line bore, thrust cut AND lifter bores in a case that's not original to the car. If it was the original engine maybe, but that's too much money to put into a single relief case.
The funny thing is that I drove that engine and I don't remember any funny noises. You'd think with a lifter bore (and more) that trashed it would have been knocking/tapping to beat the band.
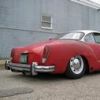
On to Victim #2. This is a dual port, dual relief case of unkown history. It's a complete engine I acquired from a guy's sandrail (which explains the red paint) and has been sitting in my storage building for years. As I inspect it, I see some past butcher has mucked up the OPS. It's been broken off in the case, and then some "mechanic" broke off an Easy-Out in the OPS stub. Oh, this is gonna be fun.
Using a magnet I determine that the OPS was aluminum and the Easy-Out is steel, of course. I lay a flat washer on the stub and fill in the recess with Mig.
Success! I get the broken Easy-Out from the broken OPS.
Next I drill the OPS out slightly larger to fit in a bigger left twist Easy Out.
It comes right out without issue and....
The case is perfect- I didn't even have to chase the threads.
There's just a hint of aluminum shavings in the galley (which "tees" just under the threads) which are easily removed with a Q-tip.
But, crap again, the case is wiped out big time. Not only does it need a line bore, but the rear main loosened up to the point it wore the case .120" at the thrust- almost an eighth inch! The main bearing dowel is egged out and loose in the case.
Put a fork in it, this one's DONE.
On to Victim #3. This a a freebie core that sat outside for years after being blown up. Supposedly it's a '66 1300 which is the first year for the later case. If the case is good it can be used to make a 1300, 1500, or 1600 SP/DP on a single relief case.
Oh, this is gonna be fun. Yes, after removing the intake manifold the head ports are FILLED with gunk and debris of unknown origin.
The heads are stuck really good requiring a serious workout to extract.
Yea, this is gonna be fun.
I bead blast the head for S&G, anyone want to buy a used SP head?
Hmmmm, those jugs look pretty thin, I mike them to find they're slip-in 87s. Somebody been in here before.....
Luckily I have "weapons of mass destruction" to get this bitch apart, it turns out a spun rod bearing was the death sentence.
And the case is not only spent, but it's been line bored .025" already and not worth trying to fix.
Three strikes and you're out, I'm running out of core engines........
'69 Ghia
Re: '69 Ghia
Give them to Chuck for the KI fire...Dual Port wrote: Three strikes and you're out, I'm running out of core engines........
Re: '69 Ghia
That 1300 case of mine you got parts of off last year is still at Chuck's. Maybe you can make that victim #4.
-
- Posts: 297
- Joined: Thu Dec 18, 2008 12:42 pm
Re: '69 Ghia
Not sure what 1300 case you speak of Sean, the one I got from you was split & stripped and burned at Mohican 2014...
Re: '69 Ghia
I have a spare 40hp case with crank and rods if you really want to make that Ghia scream!
1963 Single Cab
1964 Bowman & Sons Camper (Vegas Bus)
1966 Westy S0-42 Hardtop
1967 Westy SO-42 Pop Top
1968 Single Cab
1964 Bowman & Sons Camper (Vegas Bus)
1966 Westy S0-42 Hardtop
1967 Westy SO-42 Pop Top
1968 Single Cab
Re: '69 Ghia
I say go with the third engine
- Attachments
-
- image.jpg (14.3 KiB) Viewed 2738 times
the best ideas are often the worst choices.
vanagons
mopeds
vanagons
mopeds
Re: '69 Ghia
OK, Victim #4 is a 1600DP from Chuck, who I don't have a great track record with. Remember he also supplied Victim #3 which was the biggest pile of $hit I ever saw, so here goes.
It looks really virgin and complete like it's never been apart. The little clamps and things are all OE, and I'm thinking that's a good thing, BUT the SOB won't turn.
It takes a torch to get any nut off of this engine which is not a big surprise. Once I get the exhaust off, my first clue about what I'm getting into is the f'ing exhaust ports are FILLED with white trash.
And the intake ports are filled, too, even worse than victim #3.
This ain't looking so good.........
Getting the heads off took the big WMD- a CP 717 .498 shank air hammer ($600 gun!) which will blow holes in virtually anything.
Hmmm, isn't there supposed to be a valve in that hole?
I can't tell you how many four letter words were used disassembling this engine, I think I even invented some new ones. This SOB must have sit outside for years in the rain with no air cleaner on it.
The book says to slide the jugs off the pistons........
In my world that means take a 4" whizzer wheel and ventilate the jugs first. Brother. Work on the two cyls where the pistons are nearest to TDC, those will be most accessible. BTW, if you ever pull heads odd and see what I saw, pitch the whole thing in the trash. I worked my ass off tearing these engines down, harder than I ever have on a VW motor.
Once the two TDCish pistons have been freed, the crank will rotate a half turn and push the two BDCish pistons and jugs out a few inches. This allows access to cut the con rods with a torch.
FS: used 1600 pistons and jugs. Any buyers?
BTW, this is probably why it was parked in the first place.....
Oddly enough, when I blasted the chamber where the broken valve was, I didn't see any impact damage. Plenty of rot, though.
I get the case split and check it, and.......
Drum rollllllllllllllllll........................................
It's good! The rear main looks like brand new and the lifter bores are tight. I took some 1500 paper and cleaned the rear main saddle and although it looks a little funky in this picture it's actually perfect.
I have a '64 Beetle on the rack I'm doing a bunch of work on. The owner is not a LO member and he's moving out of state, so no use bugging him to join. It's a cool car, though, appears to be 30K original miles and in really nice shape. It's getting kingpins, tierods, clutch, electrical repair, oil leaks, trim work, axle seal, blah blah. It's about 3/4 done right now. When I get that done I'll start getting real progress on the Ghia motor since I have all the parts.
Bruce Amacker
'66 Deluxe Bus
'65 Standard Bus
'66 Deluxe Bus
'65 Standard Bus
-
- Posts: 205
- Joined: Wed Jan 05, 2011 10:17 pm
Re: '69 Ghia
Congrats Bruce on staying with that motor.....would have been easy to assume that case was junk....
Great report as usual!
Re: '69 Ghia
OK, it's been a few weeks, time for an update. Here's the Cliff Notes version of how to build a T1 motor:
First, pull the crank gear off the crank using trick tool #934.
Change the main bearing which is blocked by the gear. Then reinstall the gear, a little heat helps. I used to have a frypan for this but it stayed when I sold the shop. Two 300w Halogen lights did a great job.
The gear slid onto the crank with no interference.
Heat the distributor drive gear.
It also slid right on, then the snapring.
And oil slinger/outer bearing.
I use this spray lube for the bearings, it comes out as a liquid and gels to a light grease quickly.
Assemble the rod bearings and rods, torque to spec, and ready to lay.
The case is super clean, solvent washed, power washed, soda blasted, wirewheeled, and power washed again. Lay the crank, cam, etc. in place, don't forget the cam plug.
This is a good time to bolt on the FW and do a preliminary shim check.
Goober the case halves, I use High Tack. If you ask a hundred VW people what to seal a case with you'll start a hundred arguments. I did dry fit it first and torque it so I know nothing would bind.
Assemble, torque, verify it's all free.
Install what studs came out (or had to be changed because of DP to SP head change), use High Tack on them, too.
The Mahle pistons and jugs were like new with .017" ring gap so I reused them. They were all marked on disassembly.
Assemble the pistons on the rods.
Lube the piston pins and rings, and compress the rings and slide the jugs on.
Leave some room, do one side at a time so you can seal the jug bottoms. Wipe everything with brakeclean first (I probably use a case to build a motor!)
High Tack the bottoms of the jugs, you'll need a long paintbrush.
Work fast, put the heads on before the HT thoroughly dries.
Don't forget the air deflectors! They have to go on with the heads as the PR tubes block them.
One side at a time, assemble and torque. Pushrod tube seams go up, it had new PRTs so I reused them.
Ready for trim.
Bruce Amacker
'66 Deluxe Bus
'65 Standard Bus
'66 Deluxe Bus
'65 Standard Bus
Re: '69 Ghia
You make it look too easy Bruce..Thanks for the tutorial I've missed your write ups