If you wanna drive it down to Austintown, my old buddy does fantastic work, and has painted two of my old Astro vans.
https://guyscustompinstripingoh.com
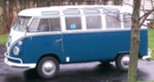
'59 Panel
Re: Sean's '59 Panel
Howie
"...the ones in love with the night, they light up like a cigarette." -Jack Kerouac
"...the ones in love with the night, they light up like a cigarette." -Jack Kerouac
Re: Sean's '59 Panel
Thanks for the tip. And Yes! A Howie post! #1974Howie wrote: ↑Thu Jan 10, 2019 2:34 am If you wanna drive it down to Austintown, my old buddy does fantastic work, and has painted two of my old Astro vans.
https://guyscustompinstripingoh.com
Re: Sean's '59 Panel
While I continue to mull over the logo theme, it was time to get to work on making the bus more drivable.
Bruce and I have been talking since I bought the bus about migrating to a big nut trans. I've been storing one in my garage for the past 5 years so there was no time like the winter to get the project in gear. (pun intended)
After deconstruction, I took the center section out to Jim's in Columbiana and had it gone through. $500 later I got it back with some new innards.
This week Bruce put me on KP duty getting everything cleaned up. And bus rear axle clean up duty is the S&^% duty of S&^% duties.  But the axle tubes came out pretty clean.
So we were off and running. Well, Bruce was off and running. He instilled in me the premise that cleanliness is next to godliness. And I got the message.
Bruce wants things clean and he will spend more time on that portion of the project than on anything else. I won't go into explaining every picture, although I actually think I'm dangerous enough to try!
Seriously, I can't say enough about Bruce taking the time to do this, but also allowing me to participate (get in his way) so I can learn something.
We had one issue with a bad outer axle bearing, but Bruce had a backup. Some of the other original bearings were bad, so Bruce swapped them out. Someone in a prior life really butchered one of the RGB housings (probably trying to get a freeze plug out) but Bruce cleaned it up. (You may see that prior damage in some photos)
This was a great learning experience and I hope amateurs, like me, enjoy the photos. We took nearly 100, but I won't overkill at this point.
I will tell fellow amateurs like me that the takeaway from this is as follows:
You have to clean everything and when you're done cleaning everything, clean everything again. Then clean it again. Wire wheel, media blast, brush in kerosene tank, brake cleaner, compressed air dry, rinse and repeat.
If you do this, you'll learn about wear marks on the axle paddles and the fulcrum plates. Bruce swapped mine around to get a better surface. He taught me how to make sure the axle and fulcrum plates don't disengage when you're putting it together. You'll learn how to get the one piece (aren't they all one piece?) axle boots without the separation and screws onto the axle tubes using a little heat and persuasion. You'll also learn about the spacer and c-clip that goes "inside" the tranny hole (left and right) and then the plastic "hat" that goes over the opening before the axle tube goes on. You'll learn about the virtues of RTV silicone when mounting the axle tube to the transmission housing. On the other end you'll learn there are inner and outer axle bearings as well as inner and outer stub bearings. And the inner stub bearing has an internal nut that has to be torqued to 108 ft. lbs. and has a raised edge that has to be pinched. More c-clips will follow and the outer housing of the RGB case can be installed following the two dowel pins as a guide.
I wouldn't ever try this on my own. I'm very happy Bruce taught me what this is all about. I'll at least be able to listen to future rear axle discussions and have some idea of what is going on.
And for the record, the ONE overbright blurry picture is compliments of Bruce!
Let's see some pics!
Bruce and I have been talking since I bought the bus about migrating to a big nut trans. I've been storing one in my garage for the past 5 years so there was no time like the winter to get the project in gear. (pun intended)
After deconstruction, I took the center section out to Jim's in Columbiana and had it gone through. $500 later I got it back with some new innards.
Bruce wants things clean and he will spend more time on that portion of the project than on anything else. I won't go into explaining every picture, although I actually think I'm dangerous enough to try!
Seriously, I can't say enough about Bruce taking the time to do this, but also allowing me to participate (get in his way) so I can learn something.
We had one issue with a bad outer axle bearing, but Bruce had a backup. Some of the other original bearings were bad, so Bruce swapped them out. Someone in a prior life really butchered one of the RGB housings (probably trying to get a freeze plug out) but Bruce cleaned it up. (You may see that prior damage in some photos)
This was a great learning experience and I hope amateurs, like me, enjoy the photos. We took nearly 100, but I won't overkill at this point.
I will tell fellow amateurs like me that the takeaway from this is as follows:
You have to clean everything and when you're done cleaning everything, clean everything again. Then clean it again. Wire wheel, media blast, brush in kerosene tank, brake cleaner, compressed air dry, rinse and repeat.
If you do this, you'll learn about wear marks on the axle paddles and the fulcrum plates. Bruce swapped mine around to get a better surface. He taught me how to make sure the axle and fulcrum plates don't disengage when you're putting it together. You'll learn how to get the one piece (aren't they all one piece?) axle boots without the separation and screws onto the axle tubes using a little heat and persuasion. You'll also learn about the spacer and c-clip that goes "inside" the tranny hole (left and right) and then the plastic "hat" that goes over the opening before the axle tube goes on. You'll learn about the virtues of RTV silicone when mounting the axle tube to the transmission housing. On the other end you'll learn there are inner and outer axle bearings as well as inner and outer stub bearings. And the inner stub bearing has an internal nut that has to be torqued to 108 ft. lbs. and has a raised edge that has to be pinched. More c-clips will follow and the outer housing of the RGB case can be installed following the two dowel pins as a guide.
I wouldn't ever try this on my own. I'm very happy Bruce taught me what this is all about. I'll at least be able to listen to future rear axle discussions and have some idea of what is going on.
And for the record, the ONE overbright blurry picture is compliments of Bruce!
Let's see some pics!
- Attachments
-
-

Re: Sean's '59 Panel
Here's some more pics:
FNG cleaning parts.
Clean parts.
FNG cleaning more parts.
More clean parts.
FNG assembling clean parts.
In the previous set of pictures you'll see blood on the big pinch nut. Ask Sean why I call a big wire wheel on a grinder the "flesh remover".

FNG cleaning parts.
Bruce Amacker
'66 Deluxe Bus
'65 Standard Bus
'66 Deluxe Bus
'65 Standard Bus
-
Karl Kombi
- Posts: 280
- Joined: Wed Sep 27, 2017 9:56 am
Re: Sean's '59 Panel
Learning from the Master -- worth more than reading 1,000 manuals...
Re: Sean's '59 Panel
Way to go Sean! Looking good.
It's Marla with an " L"
(My list of assets is just too long...)
(My list of assets is just too long...)
Re: Sean's '59 Panel
Back at it this afternoon. Bruce was really patient with me and really allowed me to learn. It was good. A lot of this is probably simple to veteran mechanics, but I quickly realized that if you forget one step or mess up one procedure you're screwed.
The rear axle seal housing install may be straightforward to most, but again Bruce stressed clean, clean, and more clean. He had me re-blast the housing and make sure I got all the star and the adjusting bolts super clean. The whole RTV lesson from yesterday was repeated.
The backing plate, wheel cylynder and brake shoe install is a lesson in persistence and brawn. Bruce showed me how its done the right way and checked and re-checked everything. I realize you've got to fight with stuff sometimes, but once you get in the right place it eventually comes together. I had the backing plate hung up slightly on the dowell, but Bruce found my error and it came out right. Bruce had to "refab" a couple brake parts that had seen better days, but his skill made it all work out fine. And again, can I say CLEAN. He wants everything to be so clean you can eat off it. That;s one lesson I will not forget.
We'll be back at it next week with the actual install. So say tuned. Here are a few more pics...
Re: Sean's '59 Panel
Great write-up Sean and great work Bruce! I actually really enjoyed rebuilding my RGBs with new bearings. My rgbs are still going strong right W5?
The Rick Lang
Re: Sean's '59 Panel
Sorry, no Syncro updates here.
Fergus and I managed to get the bus over to Bruce's shop late yesterday and avoided today's snow. This afternoon I was able to go back and get another good lesson in the life of a transaxle.
The big nurt is almost ready to go in.
Bruce took some measurements.
We have a bit too much positive camber.
rear apron and bumper off.
E-brake cables ready for disconnection.
Everything disconnected and engine out.
e-brake cables out
Bruce wants to check flywheel and rear seal. I've got a couple of pristine 40HP flywheels I got from RIS several years ago. May be time to bring one over. (Yes, I know, metal gasket/paper gasket)
Getting ready to go after tranny.
What idiot brings a bus over with 8 gallons of fuel in it knowing the tank is coming out????? 
Tranny out
Small nut got me through the fall
Dirty gas. I knew the tank was rusty/krusty.
Tank out engine bay clean
Aaron's favorites - spring plates
test fitting new tank
That won't work
Precision modification by Bruce
There's no gas in this right? 
That will work
Ok, a little more.
I'm going to have a petrol gauge?? !!!! 
Drain is plugged. Got Drain-O?
Got Bruce-O
Good to go
Fergus and I managed to get the bus over to Bruce's shop late yesterday and avoided today's snow. This afternoon I was able to go back and get another good lesson in the life of a transaxle.
The big nurt is almost ready to go in.
- Attachments
-