Vegas Bus

Re: Vegas Bus
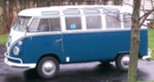
Great Tip. Steering looks really nice with the White dashboard.
1967 Beetle "Little Tud"
1968 Black Double Cab "The Black Pearl"
1970 Lotus White Single Cab "Big Tud"
1976 Sage Green Westfalia "Sweet Pickle"
They gotta' have names!
1968 Black Double Cab "The Black Pearl"
1970 Lotus White Single Cab "Big Tud"
1976 Sage Green Westfalia "Sweet Pickle"
They gotta' have names!

Re: Vegas Bus
Continuing an old thread on Ken's bus. His electrical gremlins got to the point it would no longer start without being hot wired and the 6v system was weak at best. Ken decided to pull the trigger on a 12v conversion and wiring repair, upon getting into it I saw so many issues with the harness that it made more sense to replace the harness than repair it. Could it have been repaired? Yes, it could but it would cost more than a new one, so here we go again. This is a really nice solid original bus from Cal with no rot or new metal, it deserves a new harness.
Yes, that's the same fusebox before and after blasting. Do you think there was some voltage drop there?
Bruce Amacker
'66 Deluxe Bus
'65 Standard Bus
'66 Deluxe Bus
'65 Standard Bus
Re: Vegas Bus
As usual I will take the old harness if it is not in the bin....
Re: Vegas Bus
Are you renaming your shop: "The 6V Death Chamber"?
-
Karl Kombi
- Posts: 280
- Joined: Wed Sep 27, 2017 9:56 am
Re: Vegas Bus
With the slogan - "Adding 6 more volts, one bus at a time." 
Re: Vegas Bus
I like the idea of 6V increments. That means I can go to 12V and keep my name. I'm just cloned into 2. I'll check with the Mrs. on that.Karl Kombi wrote: ↑Tue Jun 04, 2019 6:43 pm With the slogan - "Adding 6 more volts, one bus at a time."
Re: Vegas Bus
Update:
Out with the bad.
Here's a really good reason to hang a harness on an old car: You can't see this, it's 5 feet from the rear of the bus in the main power feed heading up to the dashboard. The wire had moisture get into it and corrosion crawled 5+ feet (maybe much more) forward inside the insulation which would obviously cause all kinds of issues. The old wire is compared to what a new wire looks like when peeled open.
Get organized.
Tape up the loose ends of the new harness so it can be pulled through the tight spots.
Tape the new harness to a household "fish tape" to be pulled through. I start in the middle of the bus pulling the tail end backward and the front end forward. Here I've already pulled the tail end back to the engine compartment.
Then pull the front end forward into the valance area.
You know you have the front-to-back at the correct location when the starter wires fit correctly. (The eyelet is cut off because this is where the 40A MegaFuse splices in).
Once it's pulled through the front frame rail over the axle, it's fed by hand upward into the passenger compartment with a little brakeclean to make it slippery.
Lock down the holding tabs.
Out with the bad.
Bruce Amacker
'66 Deluxe Bus
'65 Standard Bus
'66 Deluxe Bus
'65 Standard Bus
Re: Vegas Bus
Here's the new eyelet on the starter which will feed the megafuse, I soldered the eyelet on.
Then shrink tubed it.
There was so much paint on the car I'm surprised the old voltage regulator had a ground! I ground it off and buffed the bottom of the VR feet.
I'll splice the MegaFuse in now.
Here it is roughed in, just needs a bit of Polyloom to make it pretty. Everything is soldered and shrink tubed with marine grade (glue-in) shrink tubing. The ty-wrap is a reu$able style with a little release tab. The Megafuse protects the main feed going forward in case something stupid happens, like the fusebox comes loose and hits ground, or the iggy switch or HL switch touch ground. All three of these items are only millimeters from ground, it's amazing these cars don't burn more often. All modern cars have protection here but old VW's don't. 
I'll splice the MegaFuse in now.
Bruce Amacker
'66 Deluxe Bus
'65 Standard Bus
'66 Deluxe Bus
'65 Standard Bus
Re: Vegas Bus
I'm up front now. The main power feed usually goes to the fusebox, then the HL switch, then finally the ignition switch. The more connections you put in a circuit the more voltage drop you'll have. I split the main power feed into three so everything gets uninterrupted power.
It's not unusual when soldering big 10 ga wires together to get big spikes sticking off the solder job like a cowlick on a kids haircut. These would be able to poke a hole through the shrink tube.
Use a whizzer pad to buff them smooth.
The three leads are for the fusebox, iggy switch and HL switch. This one gets two layers of shrink tubing. I keep white Formica handy for shooting pictures.
Those are some fugly switches, gotta buff the terminals for a good connection.
Fugging clean.
Inside the dash: You want the gas gauge to work correctly? It needs a ground. Think it's going to find one here? NFW.
Buff that stuff, and the wiper switch mount, too, or they won't park.
Probably a good time to make sure the fuel sender is good, the range is 0 to about 80 ohms. 53 ohms means it's good and he's got about 1/3 of a tank of fuel.
Iggy switch ready to go in with its new direct power feed and shrink tube on the other spades. Once again this is right near lots of grounds so it needs to be protected.
Did he have electrical issues? It should have 6 white (8 amp) and two red (16 amp) fuses. The abundance of 16s and a blue 25 means he had issues. Look at the corrosion on those reds, I buff the ends of even new fuses when I put them in. More to come.
It's not unusual when soldering big 10 ga wires together to get big spikes sticking off the solder job like a cowlick on a kids haircut. These would be able to poke a hole through the shrink tube.
Bruce Amacker
'66 Deluxe Bus
'65 Standard Bus
'66 Deluxe Bus
'65 Standard Bus
Re: Vegas Bus
Great stuff!  These electrical seminars are really helpful.